


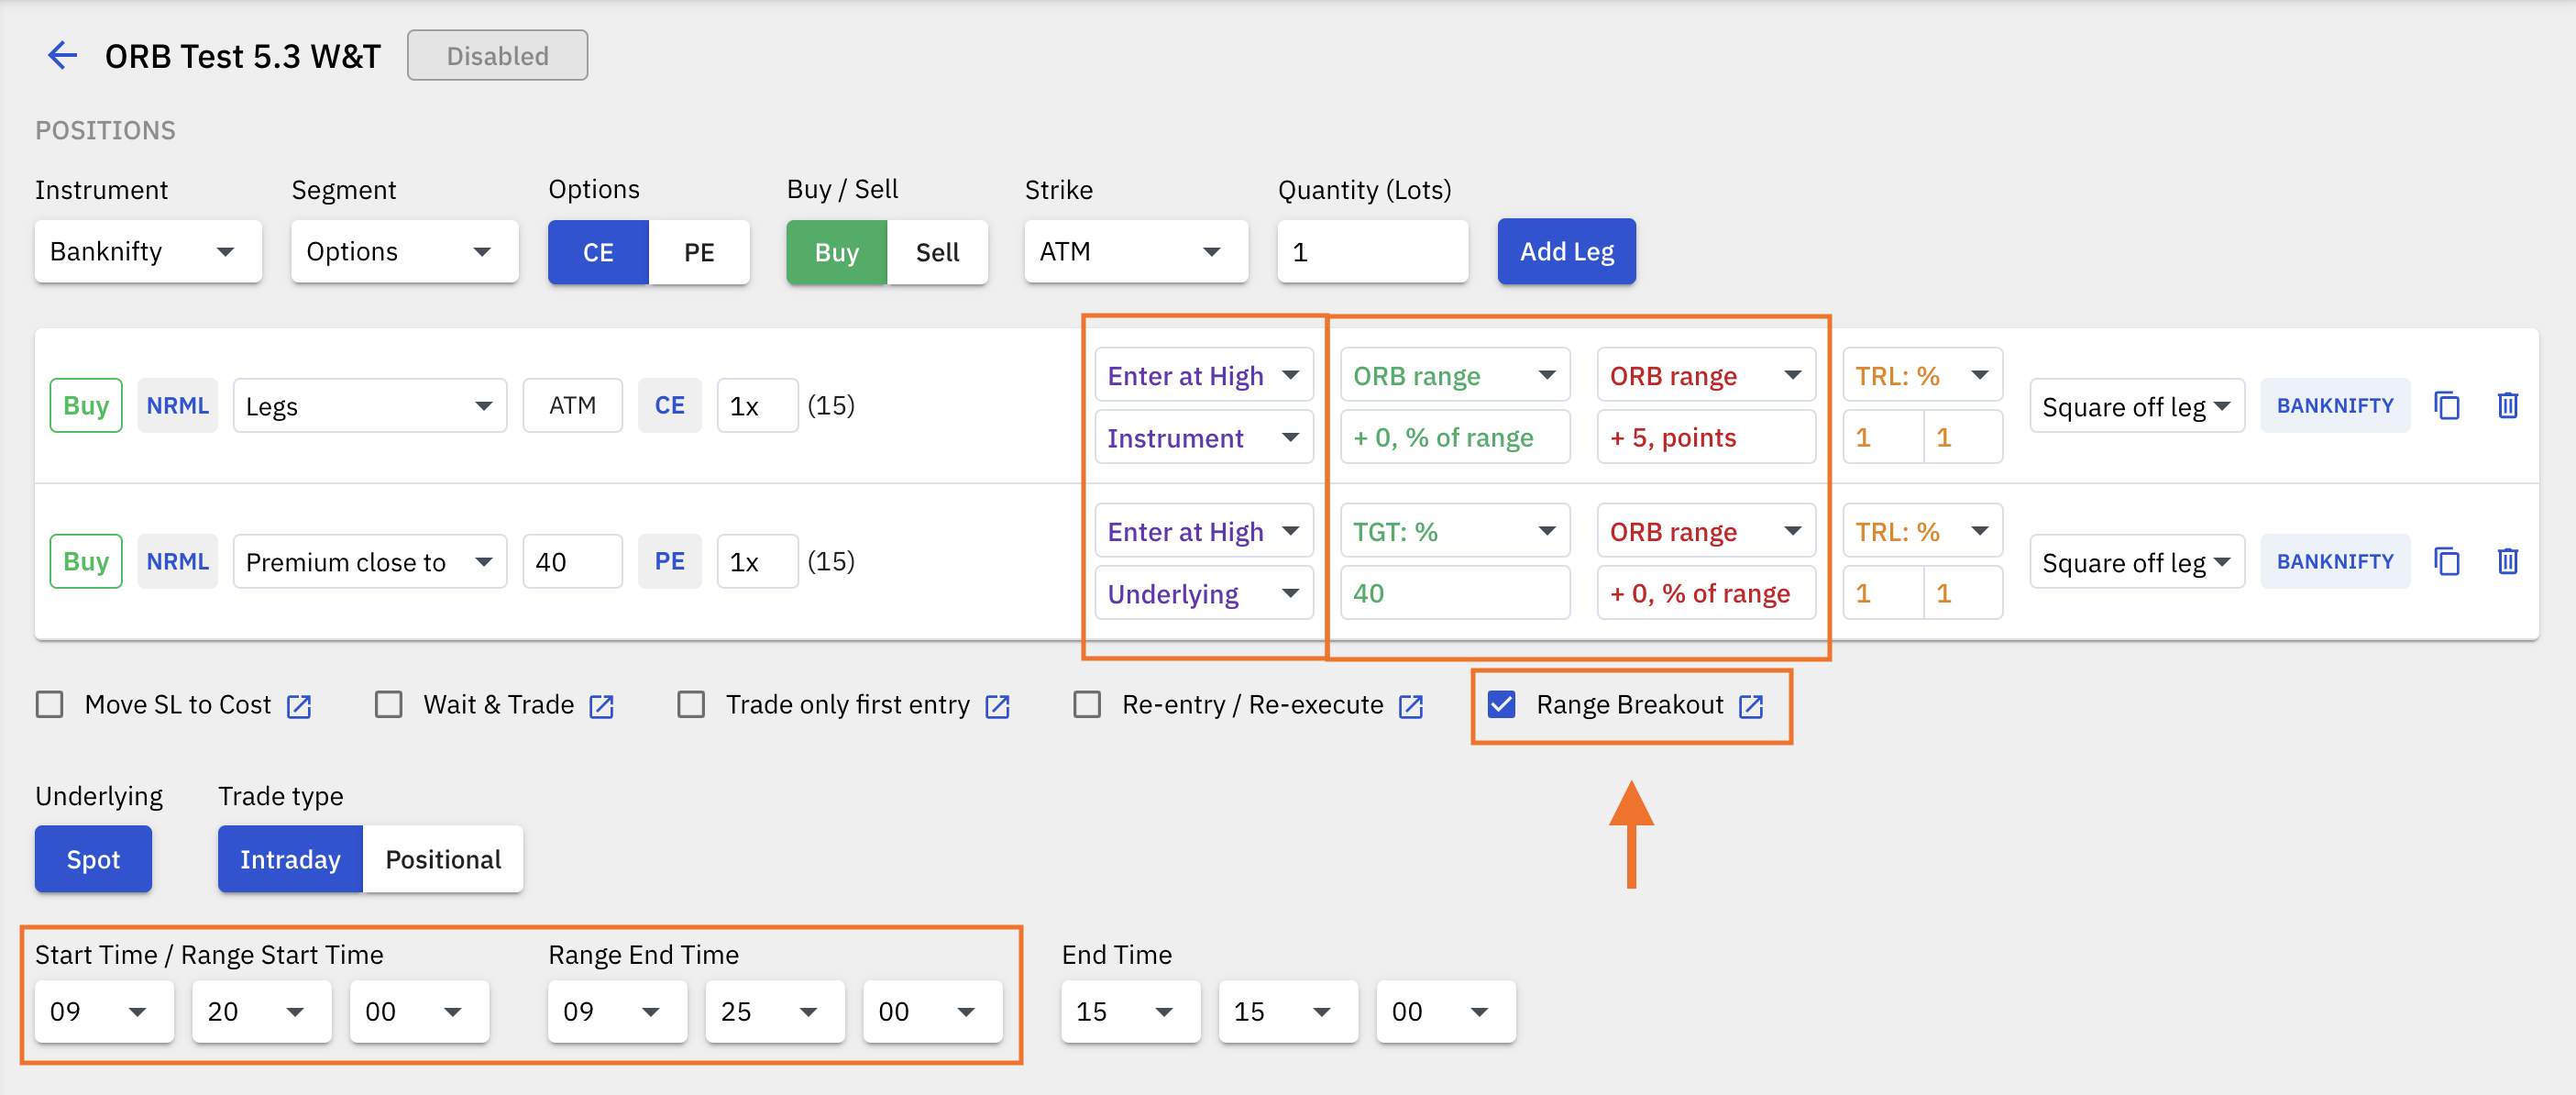
The way Range Breakout feature works is that a range is recorded from the range start time to the range end time, and a trade can be set to trigger on the high or the low of the range. The range can be captured for a tradable instrument and also the underlying spot price as well.
I. Settings:
- Range breakout feature selector.
- Entry at high/low dropdown.
- Instrument/Underlying dropdown.
- Target: ORB Range (optional setting).
- Stoploss: ORB Range (optional setting).
- Start time (Range Start Time).
- Range End Time.
- Trade only first entry (optional setting)
II. Steps to configure the Range Breakout feature:
- Configure a leg - instrument selection type, order type, quantity, buy/sell side.
- Click on the range breakout checkbox under the legs configuration table.
- Configure the start time (which is also the Range Start Time) and the Range End Time. The high and low of the price recorded between the range start time and the range end time becomes the upper and the lower entry points at which the trade will get triggered. The range is recorded from the 1st tick that comes at the start time to the last tick that comes at the end time.
- Select entry at High or Entry at Low, to trigger the entry trade either at the high of the range or the low of the range respectively.
- Select Instrument OR Underlying. If Instrument is selected, the range recorded will be that of the tradable instrument itself like an Options or a Futures contract, and if Underlying is selected, then the range recorded will be that of the underlying spot price like the Nifty, Banknifty or Finnifty spot.
- This feature also allows for the target and the stop loss values to be set to the total range recorded in points between the start time and the end time.
III. ORB Range setting for Target and Stoploss:
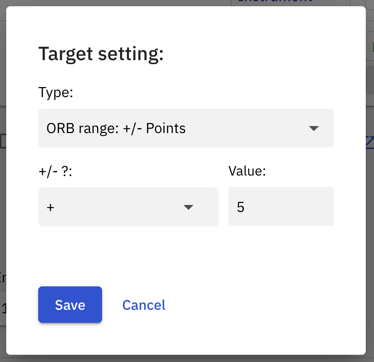
The target and the stop loss values can be set to the total range recorded in points between the start time and the end time. For example if an instrument range recorded between the range start time and range end time is 25 points, then the Target and/or the Stoploss for a trade will be 25 points if ORB range is selected as a Target or Stoploss setting. In addition to selecting the range as the Target or Stoploss, you can also add or subtract an additional buffer to the range - in points or as a percentage of the range.
EXAMPLES:
Range High: 100
Range Low: 80
Range: 20 points (range high minus range low)
Entry price: 100
Trade type: Buy
Case 1:
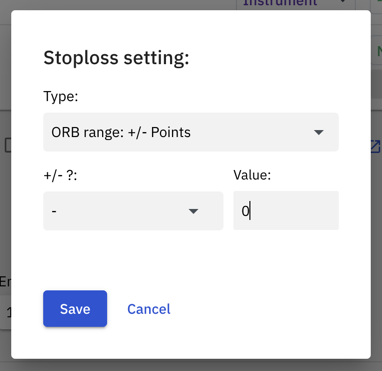
i) Target set to ORB range (where any type can be selected with Value being 0)
Target = Entry price + Range
= 100 + 20
= 120
ii) Stoploss set to ORB Range (where any type can be selected with Value being 0)
Stoploss = Entry price - Range
= 100 - 20
= 80
Case 2:
i) Target set to ORB Range + points

Example setting: ORB Range + 5 points
Target = Entry price + (ORB range + 5 points)
= 100 + (20+5)
= 125
ii) Target set to ORB Range - points

Example setting: ORB Range - 5 points
Target = Entry price + (ORB range - 5 points)
= 100 + (20-5)
= 100 + 15
= 115
iii) Stoploss set to ORB Range + points
Example setting: ORB Range + 5 points
Stoploss = Entry price - (ORB Range + 5 points)
= 100 - (20+5)
= 100 - 25
= 75
iv) Stoploss set to ORB Range - points

Example setting: ORB Range - 5 points
Stoploss = Entry price - (ORB Range - 5 points)
= 100 - (20-5)
= 100 - 15
= 85
v) Target set to ORB Range + percentage of range

Example setting: ORB Range + 20% of range
Target = Entry price + (ORB Range + 20% of ORB Range)
= 100 + (20 + 20% of 20)
= 100 + 20 + 4
= 124
vi) Target set to ORB Range - percentage of range
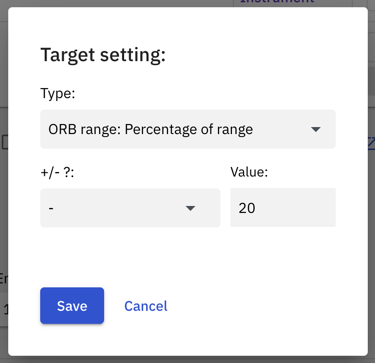
Example setting: ORB Range - 20% of range
Target = Entry price + (ORB Range - 20% of ORB Range)
= 100 + (20 - 20% of 20)
= 100 + 20 - 4
= 116
vii) Stoploss set to ORB Range + percentage of range

Example setting: ORB Range + 20% of range
Stoploss = Entry price - (ORB Range + 20% of range)
= 100 - (20+4)
= 100 - 24
= 76
viii) Stoploss set to ORB Range - percentage of range

Example setting: ORB Range - 20% of range
Stoploss = Entry price - (ORB Range - 20% of range)
= 100 - (20-4)
= 100 - 16
= 84
IV. Trade only first entry with Range Breakout
This is a checkbox under the legs configuration table that allows you to activate or deactivate a functionality which allows the algo to take only the first entry that fulfils the Range Breakout condition. This setting is visible and can be selected only when Range Breakout or Wait & Trade functionality is activated.
This setting if activated will make sure only the first leg that matches the entry condition gets executed, the other leg/legs will not get executed and will stay in the PENDING state.
In the middle of the trade, this setting can also be disabled if you wish to take positions in the other legs.
V. Range Breakout with Wait & Trade:
In the case where Range Breakout and Wait & Trade both are selected, first, the range is recorded to get the high and low of the range, then then wait & trade condition is applied to the high or the low of the range to get the entry price. Hence, here, the high and low of the range become the reference price from where the wait & trade entry price is calculated.
Know more about what reference price is, in the Wait & Trade section here: https://quantiply.tech/documentation/features-trade-logic/wait-and-trade.
EXAMPLE:
Range Breakout setting: Entry at High
Wait & Trade setting: 10% ↑
Range High: 100
Range Low: 80
Range: 20 points (range high minus range low)
Trade type: Buy
In the above case, the buy entry will happen at..
Reference price (Range high) + 10% of reference price
= 100 + (10% of 100)
= 110
Buy entry will trigger at 110.
VI. Important Pointers:
- Target and Stoploss are calculated from the entry price and NOT from the range high or range low.
- Range high and low can vary slightly from the price you see on the chart. Note that Quantiply uses the LTP received in the live feed from the broker, whereas the backtests and charts use 1 min historic OHCL or snapshot OHLC data.
- For the range to be defined the Algo has to be on from the start time to the range end time. For example if the start time is 9:20 AM, and you have turned on the Algo only at 9:30, and range end time is 9:45 AM, the range captured will be from the time the Algo has started which is around 9:30 to 9:45 AM and NOT 9:20 AM to 9:45 AM.
- Trade only first entry can be used with Range Breakout. Only the first trade will be taken, the other pending trade(s) will be cancelled once the first trade has executed successfully.
- Start time and range end time are not editable once the algo in in the TRADE ACTIVE state ie. after the algo has gone from Ready status to the Trade Active Status after crossing the start time.
- Range Breakout can work with Wait & Trade. If Range Breakout is selected on Underlying, then Wait & Trade setting also has to selected for Underlying. Likewise, if Range Breakout is selected on Instrument then the Wait & Trade setting also has to selected for Instrument.
- Re-Execute and Re-Cost re-entry work the same way with Range Breakout as they do without Range Breakout.